I did a project on temperature/humidity logging a couple of years ago. In that project I logged the temperature and humidity readings in my basement lab over the course of a year. One issue with the approach I took back then was that the data could not be observed in real time because the logged data were written to an SD card and could only be retrieved once the logging process was done.
So naturally this time around I wanted to build a data logger with better capabilities. One way to obtain real time data is to stream the logged data over the Ethernet so that the data can be logged, processed and then displayed on a PC. And this is the approach I took.
The Ethernet chip Arduio officially supports is WIZnet’s W5100. But it seems that Microchip’s ENC28J60 based controller boards can be had at a much lower price point and several libraries (like this one) already exist so I decided to give that a go.
The temperature/humidity sensor I used in this project is Sensirion’s SHT21. I have used it in many of my projects before and it is very easy to use with various libraries readily available. One thing to note is that the maximum Vcc for SHT21 is around 3.3V. So if you were to use 5V on your MCU, an I2C level translator (i.e. TI’s PCA9517) needs to be utilized in order to avoid damage to the sensor.
The ENC28J60 module I used can be obtained on eBay for less than $5. Since both the sensor and the Ethernet module operate at 3.3V, it is much easier to power the MCU at 3.3V as well so that we do not have to worry about voltage level translations. While ATmega328p is not rated to run at 16Mhz at 3.3V, in normal cases this shouldn’t be an issue. Since the default Arduino fuse settings assume a 5V supply voltage, you might need to adjust the fuse settings in situations where the load can change rapidly and the power supply is not able to maintain a steady 3.3V output. But for this particular application, the current draw is pretty stable at around 120mA so as long as a regulated power supply is used, no additional changes are necessary for the MCU to run at the lowered voltage.
The actual build is quite simple: just hook the sensor to the I2C bus and connect the Ethernet module to the SPI bus and we are done. Right? Well, sort of.
One thing I found out after putting the circuit together is that the ENC28J60 would somehow become unresponsive after a while (sometimes a couple of hours, sometimes a little bit longer). After googling around, it appeared that this was caused by the limitations of the ENC28J60 library code and would happen when a new request is made while there is still a pending request. This certainly sounds like a plausible explanation.
Since request collisions cannot be easily avoided (increasing the interval between requests will help somewhat but won’t eliminate the problem as we do not have control over all the other devices connected to the same network), this shortcoming is certainly a big problem for a data logger that is supposed to be working 24/7.
So how do we resolve this? Obviously we could go through the library code and make appropriate changes to make it more robust. But this would be a rather daunting task given the lengthiness of the specifications and the complexity of the code. I may eventually get to this but it is certainly not something that can be achieved in a couple of days’ time frame for sure.
Auto-reset circuit
There are always two ways to tackle a problem: one is to solve it and the other is to avoid it. Since solving the issue from a coding standpoint is rather complicated, this leaves me with the latter option.
My solution to the problem is actually quite simple. Since the Ethernet module may hang once a couple of hours at the most, communication can be re-established if we just simply power cycle the MCU and the Ethernet module (e.g. turning off and on) and if we set the power cycle interval to be once per hour, we can pretty much guarantee that the Ethernet interface will never be stuck in the unresponsive state. Should the Ethernet module hang, we could always count on the next reset to bring it back to a well known state.
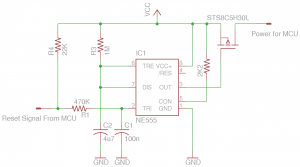
The following schematic shows how this auto-resetting can be done with a 555 timer and a P-channel MOSFET.

The 555 timer is configured in monostable mode. When a low pulse is supplied at the trigger pin (pin 2), the above circuit will output a positive pulse with the pulse width determined by 1.1*R3*C2. When the circuit is triggered, an output high shuts down the P-MOS switch. After the specified time delay, the output signal goes low and thus the P-MOS switch is again saturated.
Since we are using an MCU, we can output the trigger signal programmatically at an interval defined in code.
Note that the drain of the MOSFET serves as the power supply to the remainder of the circuit (the MCU, Ethernet module and the sensor), so when the timer circuit is triggered it is equivalent to power cycling the entire circuit. Using the component values given above, the power off time is roughly 5 seconds. If we set the trigger to be once every hour (more on this later), then the circuit will be powered off for 5 seconds and then powered back on every hour.
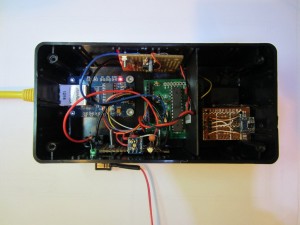
The following picture shows the general layout of everything in a project box. The Ethernet module is on the left side. At the bottom is the board for the 3.3V regulator. The timer board is located towards the top of the picture. The temperature and humidity sensor is isolated in a separate chamber to minimize the reading errors due to the heat generated from the rest of the circuit. Several ventilation holes were also drilled on the side walls around the sensor to ensure more accurate measurement of the environment. I used the ATmega328P development board I designed earlier. Since the dev board has dedicated SPI and I2C ports broken out, it is very easy to hook everything together.

The code – a crude web service
The code is very simple and you can see the entire code listing below. Note that by default, the chip select pin used for SPI in the EtherCard library is pin 8 which is not the standard CS pin on an Arduino (pin 10). Since the ATmega328P development board uses pin 10 as CS, the pin number needed to be supplied as the extra parameter in the begin function call.
While we can generate code to render an html page to display the sensor readings, it is probably not a good idea since ATMega328P is not a particularly powerful MCU and its resource is quite limited. In order to provide good user experience, some post processing is required to render and display the data (I will cover it in the next post).
So instead of returning an html page, the code below simply returns the temperature and humidity readings separated by a comma. It is technically not a valid html format (if you try it with your browser, you will get a prompt asking you to download the document since the browser couldn’t find valid html tags in the response and does not know what to do with it), but we are merely interested in the data anyway. Thus, the entire circuit functions kind of like a very crude web service. When an HTTP request is made, the temperature and humidity readings are returned.
You will also notice that the temperature and the humidity readings are both scaled by a factor of 100. This is because sprintf here doesn’t handle floating points. Since we are going to do our post-processing on a PC anyway, there is no point in rendering the result on the MCU.
In my code, the 555 triggering signal is generated on pin 5. Upon power on, it is set to output HIGH. Within the loop, we check to see how long the circuit has been powered on. And if it is more than 3600,000 milliseconds, the reset pin is pulled low which triggers the timer circuit to cut off the power for 5 seconds.
#include <EtherCard.h>
#include <Wire.h>
#include <LibHumidity.h>

LibHumidity tempSensor = LibHumidity(0);
static byte mymac[] = {0xFF,0xEE,0xDD,0xDD,0xEE,0xFF};
byte Ethernet::buffer[500];

char s[15];
int t, h;

char fmt[] = "%d,%d"; //output data format
const int pinResetSignal = 5; //power reset signal pin
unsigned long ts;

void setup(){
    pinMode(pinResetSignal, OUTPUT);
    digitalWrite(pinResetSignal, HIGH);

    ts = millis();
    Serial.begin(9600);

    if (ether.begin(sizeof Ethernet::buffer, mymac, 10) == 0) //use pin 10 as CS
        Serial.println( "Failed to access Ethernet controller");
    if (!ether.dhcpSetup())
        Serial.println("DHCP failed");
}

void loop(){
    if (millis() - ts > 3600000ul)
        digitalWrite(pinResetSignal, LOW); //generate reset pulse once every hour

    t = 100 * tempSensor.GetTemperature();
    h = 100 * tempSensor.GetHumidity();
    sprintf(s, fmt, t, h);

    // wait for an incoming TCP packet, but ignore its contents
    if (ether.packetLoop(ether.packetReceive())) {
        memcpy(ether.tcpOffset(), s, sizeof(s));
        ether.httpServerReply(sizeof(s) - 1);
        delay(1000);
    }
}

