In this post I will show you a simple Zenner diode tester circuit, when coupled with a PWM generator it can be used to measure the breakdown voltage of Zener diodes. Or more generically, it can be used to measure the breakdown voltages (e.g. BVceo, BVcbo) of BTJ transistors.
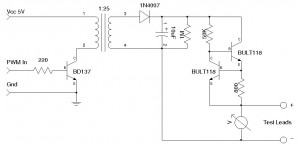
The schematic below is the circuit diagram of the Zener diode tester:

As you can see, the circuit is consisted of a simple flyback converter to generate the high voltage needed for the breakdown condition and a constant current source to limit the current flowing through the device under test.
The transformer is modified from the inductor in a CFL bulb. Since a CFL typically switches at around 25,000 Hz, we can tune our voltage converter to operate at roughly the same frequency to minimize the converter loss. In order to use the flyback configuration, a separate winding must be made as the primary. This can be easily done by using magnet wire to wind a few dozen turns outside the inductor coil. The exact number of turns needed is dependent on the desired output voltage. In my example, the ratio between the primary and secondary windings is roughly 1:25, and the DC output is around 150V.
We could have just used a resistor to limit the output current. The main issue of this approach is that the current flowing through the device to be tested depends heavily on the breakdown voltage of the device. In order to make this current constant, two high-voltage BJTs are used to form a constant current source. The output current is determined by the value of Vbe (typically around 0.7V) and the resistor between the base and the emitter. For the components value given, the current is approximately 1mA.
Since the hFE of BULT118 is rather small, the performance of the constant current source is relatively poor, but it is still magnitudes better than the simple resistor current limiting approach. To improve the current source performance, you can use higher hFE transistors or Darlington transistors in place of BULT118.
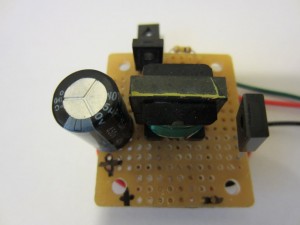
The picture below shows the test circuit built on a perf-board.

To drive this circuit, a 5V PWM signal needs to be supplied. You can fine tune the output voltage of the converter via the duty cycle and the frequency of the PWM signal.
The code below shows an example of generating the required PWM signal via Arduino. Of course, you can use other methods (e.g. a 555 timer) to generate the PWM signal as well.
void PWMGen(float dutyCycle, float freq)
{
  if (dutyCycle > 1.0) dutyCycle = 1.0;
  else if (dutyCycle < 0) dutyCycle = 0;

  cli();
  TCCR1B = _BV(WGM13) | _BV(CS11) | _BV(CS10) | _BV(ICNC1);
  //f0 = fclk / (2 * N * Top)
  long topv = (long) (F_CPU /(freq * 2.0 * 64.0));
  ICR1 = topv;

  OCR1A = (int) ((float) topv * dutyCycle);
  OCR1B = (int) ((float) topv * (1 - dutyCycle));
  DDRB |= _BV(PORTB1) | _BV(PORTB2);
  TCCR1A = _BV(COM1A1) | _BV(COM1B1);
  sei();
}

void setup()
{
   PWMGen(0.5, 20000); //20kHz on pin 9
}

void loop()
{
}

