In my previous post, I took a quick look at the EnOcean sensor kit from Newark for Raspberry Pi and tested its basic functionalities using the Fhem home automation software. In this blog post, I will walk you through the process of compiling and running the example code that comes with the EnOcean Link library. While there are instructions on how to do this, some of the information is out-dated and hard to follow. So I will provide my own step-by-step instructions here.
Raspberry Pi uses ARM architecture, so you cannot compile the code on your PC directly as most of the PCs are based on x86. Basically, there are two ways compile the code. One way is to cross-compile using the gcc arm tool chain (such as linaro). If you are interested in setting up a cross-compiling environment using Eclipse, you can take a look at this article here for detailed information.
The other way is to compile the code natively. In this blog post we will compile the code on the Raspberry Pi directly via command line. The benefit is that you don’t need any IDE setup. I assume that you are using Raspberry Pi’s default OS (Raspbian) and using the latest version of EnOcean Link source code (you will need to first register on EnOcean’s webite before you can download the latest code). Also, if you had installed Fhem before, you will need to uninstall it as it is also using the serial port that we will be using.
First, download EnOcean_Link__1_4_0_0_trial.zip from EnOcean (an earlier version can be found on element14’s website) and unzip it to your user directory. After unzipping, you should see three sub-directories (EOLink, examples, Tutorial) created.
All the tools necessary for building the source code can be installed via the following command on the Raspberry Pi:
sudo apt-get install build-essential libtool autoconf
Before building the example code, we need to first build the EOLink library:
cd EOLink
./configure
make all
sudo make install
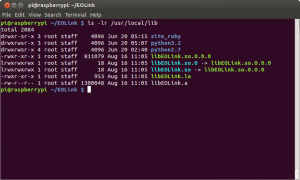
configure and make each takes a couple of minutes to execute. After “make install”, you should see libEOLink libraries installed in /usr/local/lib:
Now we can go ahead and build the tutorials and examples.
The default source code for the tutorials and examples assume that you are using the USB300 gateway. When using the EnOcean Pi adapter board for the Raspberry Pi, we will need to change the port from /dev/ttyUSB0 to /dev/ttyAMA0
#define SER_PORT "/dev/ttyAMA0"
After making changes to all the source files (*.cpp), you can compile the ones you want to test with using the following command:
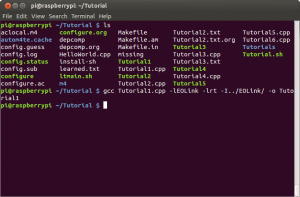
gcc Tutorial1.cpp -lEOLink -lrt -I../EOLink/ -o Tutorial1
This should be done within the Tutorial directory (see screenshot below):

The code under the examples directory compiles slightly differently. Each example is in its separate source cpp file and the examples are then run from sandbox.cpp.
In the following demonstration, I only enabled the gatewayExample() function inside the sandbox.cpp.
#include <stdio.h>
#include "examples.h"

int main(  int argc, const char* argv[]  )
{
	gatewayExample();
	return 0;
}
I also modified the Gateway_example.cpp a bit and removed portions of code that was not used in our example. Here is the full code listing of the modified source:
#define SER_PORT "/dev/ttyAMA0"
#include "./eoLink.h"
#include <stdio.h>

void gatewayExample() {
    eoGateway gateway;
    uint16_t recv;

    gateway.Open(SER_PORT);

    //we set now the automatic RPS-Teach-IN information
    gateway.TeachInModule->SetRPS(0x02,0x01);
    //Activate LearnMode
    gateway.LearnMode=true;

    while (1) {
        recv = gateway.Receive();

        if (recv & RECV_TELEGRAM) {
            printf("eoDebug---telegram---");
            eoDebug::Print(gateway.telegram);
        }

        if ((recv & RECV_TEACHIN)) {
            eoProfile *profile = gateway.device->GetProfile();
            printf("Teachin>Profile: Device %08X Learned-In EEP: %02X-%02X-%02X\n", gateway.device->ID, profile->rorg, profile->func, profile->type );

            for (int i = 0; i<profile->GetChannelCount(); i++) {
                printf("Teachin>Channel Count %s %.2f ... %.2f %s\n", profile->GetChannel(i)->ToString(NAME), profile->GetChannel(i)->min, profile->GetChannel(i)->max, profile->GetChannel(i)->ToString(UNIT));
            }
        }

        if (recv & RECV_PROFILE) {
            printf("Profile Device %08X\n", gateway.device->ID);
            eoProfile *profile = gateway.device->GetProfile();

            uint8_t t;
            for (int i = 0; i<profile->GetChannelCount(); i++) {
                if (profile->GetValue( profile->GetChannel(i)->type, t) ==EO_OK)
                    printf("--%s %u \n", profile->GetChannel(i)->ToString(NAME),t);
            }
        }
    }
}
To comiple this example code, use the command below to generate the example binary under examples directory:
gcc sandbox.cpp Gateway_example.cpp -I../EOLink/ -lrt -lEOLink -o example
Here is a short video showing the output messages when the four buttons on the pushbutton transmitter module are pressed sequentially and the last two messages were sent from the temperature module and the reed relay module. Note that button push and button release messages are sent separately.
|
View on YouTube in a new window |
EnOcean Serial Protocol
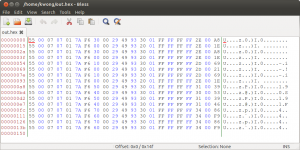
Because the data coming out from the EnOcean Pi is serial (via UART), we can easily capture the output data packets using a standard serial port terminal (such as GtkTerm). The following screenshot shows some captured data when the four buttons on the switch module are pressed. As you can see there are altogether eight messages because each button generates two separate events (push/release).
Let’s take a look at the first message and compare it to the EnOcean serial protocol specifications:
55 00 07 07 01 7A F6 30 00 29 49 93 30 01 FF FF FF FF 2E 00 A8
According to the specifications, all communications begin with a sync byte (0x55) and the following 4 bytes are the header (00 07 07 01). 0x7A is the CRC8H byte. Following the CRC byte are the data bytes. In the example above the data being transmitted are:
RORG = F6
SrcID = 00294993
Status = 30
SubtelCount = 1
DestID = FFFFFFFF
dBm = -46 (-2E)
Again the last byte A8 is the message checksum. So, you can easily create your own libraries and use EnOcean sensors with other MCU platforms (e.g. Arduino, MSP430, PIC, 8051, etc.).


