A while ago, I did a tear-down of a Keithley 196 bench multimeter. Towards the end of that post I showed a picture of my breadboard setup for backing up the firmware EPROM (27128) in case I needed to re-flash the firmware in the future. Since then, quite a few people had asked me to provide more details on how to do this using an Arduino. So I thought I would explain a little more here.
If you need to read/write many different types of EPROM/EEPROMs, you probably want to get a dedicated programmer like the TL866cs (or TL866a) Dave reviewed before. But if you are just doing one-offs or you do not want to spend the money, you could just build a simple programmer that is specific to the EPROM/EEPROMs you are dealing with.
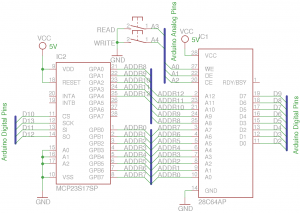
The schematics below shows one such simple EPROM programmers using an Arduino and a SPI port expander chip (MCP23S17). The port expander is needed to address all the address pins of the parallel EPROM as the available pins on a standard Arduino board (ATMega328p) are limited. The EPROM used here is a standard 64 kbit parallel EPROM (i.e. 2764), 28C64 is just the symbol I could find in Eagle. These EPROM chips are pin-compatible.
Because the RAM and EEPROM in ATMega328p are limited, reading external EPROM content into these memory locations are usually not practical. So the easiest way to read and write external EPROM content is through the use of the UART port. While we could write more elaborate code to send the EPROM content between an Arduino and the PC, I find that printing out the information on the serial monitor and use a little program to convert the result into the binary form a much more reliable approach when dumping the firmware. When writing firmware to the EEPROM, you can use the “send raw file” feature of many available serial terminal programs (e.g. GtkTerm under Linux) to send the firmware to Arduino via the serial port.
The code listing below shows an example of using Arduino to backup and flash firmware. The MCP23S17 library referenced can be downloaded from here.
#include <SPI.h>
#include <MCP23S17.h>

const int MAX_ADDR_BITS = 13;
const int MAX_ADDR = 8192;

const int PIN_D0 = 2;
const int PIN_D1 = 3;
const int PIN_D2 = 4;
const int PIN_D3 = 5;
const int PIN_D4 = 6;
const int PIN_D5 = 7;
const int PIN_D6 = 8;
const int PIN_D7 = 9;

const int PIN_WE = 14;
const int PIN_OE = 15;
const int PIN_CE = 16;

const int PIN_READ = 17;
const int PIN_WRITE = 18;
const int PIN_TEST = 19;

MCP mcp(0);

bool enableWrite;
int addr;

void setReadMode() {
    for (int i = 2; i<= 9; i++) pinMode(i, INPUT);
}

void setWriteMode() {
    for (int i = 2; i<= 9; i++) pinMode(i, OUTPUT);
}

void setup() {
    Serial.begin(1200);

    for (int i = 14; i<=16; i++) pinMode(i, OUTPUT);
    for (int i = 1; i <= 16; i++) mcp.pinMode(i, LOW);

    digitalWrite(PIN_WE, HIGH);
    digitalWrite(PIN_OE, HIGH);
    digitalWrite(PIN_CE, HIGH);

    pinMode(PIN_READ, INPUT);
    digitalWrite(PIN_READ, HIGH);

    pinMode(PIN_WRITE, INPUT);
    digitalWrite(PIN_WRITE, HIGH);

    pinMode(PIN_TEST, INPUT);
    digitalWrite(PIN_TEST, HIGH);

    enableWrite = false;
    addr = 0;
}

void writeEPROM() {
    while (Serial.available()) {
        byte b = Serial.read();
        delay(1);
        writeAddr(addr, b);
        addr++;
    }
}

void dumpEPROM() {
    setReadMode();

    for (int a = 0; a < MAX_ADDR; a++) {
        if (a % 16 == 0) {
            Serial.println();
        }

        Serial.print(readAddr(a));
        Serial.print("  ");
    }

    Serial.println();
}

byte readAddr(int addr) {
    for (int a = 0; a < MAX_ADDR_BITS; a++) {
        mcp.digitalWrite(a + 1, (addr & (1 << a)) >> a);
    }

    delay(1);
    digitalWrite(PIN_CE, LOW);
    delay(1);
    digitalWrite(PIN_OE, LOW);
    delay(1);

    byte o = 0;

    for (int i = 2; i<=9; i++) {
        o = o | (digitalRead(i) << (i - 2));
    }

    digitalWrite(PIN_CE, HIGH);
    delay(1);
    digitalWrite(PIN_OE, HIGH);
    delay(1);

    return o;
}

//FM1608
void writeAddr(int addr, byte val) {
    for (int a = 0; a < MAX_ADDR_BITS; a++) {
        mcp.digitalWrite(a + 1, (addr & (1 << a)) >> a);
    }

    for (int i = 2; i<=9; i++) {
        int a = i - 2;
        digitalWrite(i, (val & (1 << a)) >> a);
    }

    digitalWrite(PIN_WE, LOW);
    delay(1);

    digitalWrite(PIN_CE, LOW);
    delay(1);

    digitalWrite(PIN_CE, HIGH);
    delay(1);

    digitalWrite(PIN_WE, HIGH);
    delay(1);
}

void loop() {
    if (digitalRead(PIN_READ) == LOW) {
        dumpEPROM();
    } else if (digitalRead(PIN_WRITE) == LOW) {
        enableWrite = true;
        setWriteMode();
        addr = 0;
    }

    if (enableWrite) writeEPROM();
}
Function readAddr reads a byte from the EEPROM address passed in, the signaling works for the majority of the parallel UV erasable EPROMs, EEPROMs and FRAMs (e.g. 2764, 27128, FM1608 etc.). dumpEPROM simply reads the content at each memory location and writes them out to the serial monitor (16 bytes per line, separated by spaces). This output can then be copied to a text file and converted into the binary form (more on this later).
Function writeAddr writes a byte into the EEPROM at the address passed in. The signaling here is specific to FRAM FM1608, so you will need to modify the code if you were using another chip. Function writeEPROM waits till a byte is available at the serial port and writes this byte into the next location pointed to by addr. Because everything comes from the serial port are treated as content and written into the target chip, it is important to ensure that the only data being transferred at the moment are from the ROM dump. Otherwise, the content written into the target chip could be corrupted.
The timing I used here is extremely relaxed, the baud rate is set to 1200 and there are plenty of delays inserted in the signals generated. Depending on the EEPROM you use, this timing can be adjusted accordingly.
To facilitate reading and writing, two buttons are used. To read the content, open the serial monitor from the Arduino IDE (this will reset the MCU) and then press READ. Wait till all the content has been written to the serial monitor and then copy and paste the content into a text file. Use the program below (C#) to convert the text file back into the binary form.
You will need to replace the name and the location of the text file and the binary file.
using System;
using System.IO;

namespace romimage
{
	class MainClass
	{
		public static void Main (string[] args)
		{
			StreamReader sr = new StreamReader("~/EPROMDump.txt"); // the text file
			FileStream fs = File.Create("~/EPROMDump.ROM"); // converted binary file

			while (!sr.EndOfStream) {
				string s = sr.ReadLine();
				string[] ay = s.Split(' ');

				foreach (string c in ay) {
					if (c.Trim() != string.Empty) {
						byte b = Convert.ToByte(short.Parse(c));
						fs.WriteByte(b);
					}
				}
			}

			sr.Close();
			fs.Close();
		}
	}
}
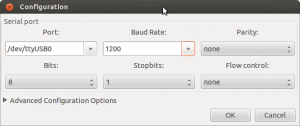
When writing to the target chip, make sure that the WRITE button is first pressed before sending the file via the serial terminal (e.g. GtkTerm), otherwise the Arduino is not ready and the data would be lost. Also, you need to make sure the terminal setting matches that used in the code for Arduino. In our example, the terminal needs to be changed to a baud rate of 1200:
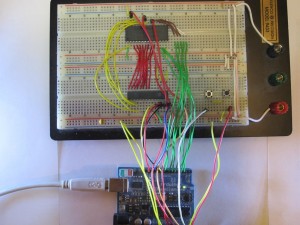
Finally, here is a picture of the breadboard setup. The memory chip used here is an FRAM chip FM1608.


