Since the current Arduino tools do not support in-circuit debugging, you will have to rely heavily on the serial print outs when tracking down those hard-to-find bugs unless you are one of those few elites whose code just works 100% every time. It is all good when you are doing your development when a computer is readily available. But what if you need to capture the outputs when you do not have the access to a computer? I found myself running into this situation quite often.
One way to solve this problem is to use a serial monitor (like this one I built before) to output the values onto an LCD display. But if your application generates a lot of messages, it would still be hard to spot the relevant information as you can only see the last couple of lines of the data.
So my solution is to add a none-volatile off-screen buffer to the serial display so that multiple rows of data can be captured during run time and retained for later debugging.
While ATmega328 has built-in EEPROM of 1Kbytes, there is not nearly enough space to store much information for debugging purposes, so clearly some kind of external memory is needed.
For the external memory, I prefer using FRAM over EEPROM as FRAM can be written to almost instantaneously whereas for EEPROM some delay is required for the write operation. Also, FRAM can handle many more read/write cycles which makes it ideal for this kind of applications in which data needs to be refreshed all the time. In one of my previous blog postings, I wrote about how to interface FRAM with Arduino. You can refer to that posting for more details.
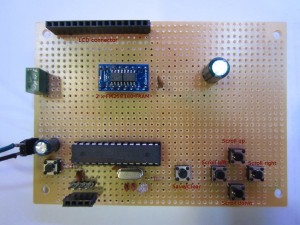
In my implementation, I used two Ramtron FM25C160‘s which provide 4 Kbytes of storage space. And I used a standard 16×2 character LCD for display. If we allow each line to contain up to 32 bytes of data (16 bytes will be off screen, but can be viewed via scroll function) we will have 128 lines available to us in the buffer. If this is not sufficient, you can always add more memory chips or choose one that offers bigger storage space.

To store the information sent to the serial monitor in the off-screen buffer, a circular buffer construct is needed. The serial data stream is stored into the circular buffer as it comes in and when the buffer becomes full, the pointer that points to the buffer’s bottom address is incremented, purging the oldest record in the buffer and making room for another a new row in the mean time. So the circular buffer always contains the latest serial outputs (up to the latest 128 lines in this setup). You can find the implementation details in the full code listing at the end.
To simply the coding a little bit, the values of the pointers for tracking the buffer top, bottom and the current scroll position are kept in volatile memory (RAM), they are flushed to the ATmega’s EEPROM on demand by pressing the “save” button. So if you want to save the data recorded so far (note that the actual data is always stored in the buffer, but without saving the buffer pointers, there is no way to retrieve it), you can press the “save” button before powering off the MCU. When the MCU is first powered up, it checks to see whether the buffer location pointers were previously stored, and if so the previously saved values are loaded and the displayed content is scrolled to that position so that user can continue to work on the data in exactly the same state as before. The save button also functions as a “clear” button in my implementation. If you hold down the “save” button for more than a second, all buffer pointer locations are reset to zero and all information previously stored in the FRAM is cleared. You can examine the source code for more details.
Of course we could have just used a few dedicated locations in the FRAM to store the buffer pointer information on every single buffer write instead of saving this information in EEPROM on the MCU. This alternative approach would probably be a little more convenient as the buffer pointers are always updated and saved automatically each time when a data row is saved. There is no particular reason why I couldn’t have done that. It is totally up you to decide which is the best method to meet your particular need.
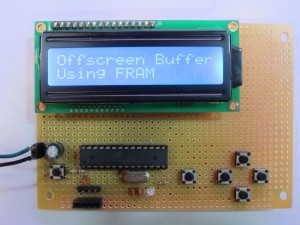
In the picture below you can see the finished serial display. Besides the save/clear button mentioned earlier, there are four additional buttons for scrolling.

Note that I omitted the UART to RS232 converter chip since most of my debugging are done via UART. But you can easily add one if you intend to use it with RS232 voltage level compatible devices.
Here is a typical usage scenario: connect the serial display to the circuit you are debugging via serial cables (Rx, Tx and Gnd). Make sure that both sides operate at the same baud rate (in this case it’s 9600 bps). Start your testing. The serial outputs are then stored into the none-volatile memory on the serial display board. When you are done capturing the data, press the save button and you can then power off and disconnect the serial display from your test circuit and analyze the stored information later.

