I have been using AVR for quite a while but have never used any PIC micro-controllers from Microchip. It seems that both AVR and PIC camps have very strong preferences towards their own technologies and there are lots of AVR vs. PIC articles out there. So I thought why not give PIC a try and see it for myself.
I happened to have a few PIC18F chips around, so I decided to use the PIC18F4553 chip for my first project instead of having to buy new ones. Since I never used PIC before, I do not have any PIC compatible programmers at hand so I decided to build a simple one myself.
The easiest ones seem to be parallel programmers. After looking around and comparing different kinds of parallel programmers, I decided to give this low voltage parallel ICSP programmer a try since it is the simplest, using only a single resistor! While it was designed specifically for the Broccoli18 programming tool and the project appeared to be quite dated (last updated in 2003), I couldn’t resist the simplicity of the hardware design and thought it was definitely worth a shot. I thought that I could always try other more complex designs if this one did not work out.
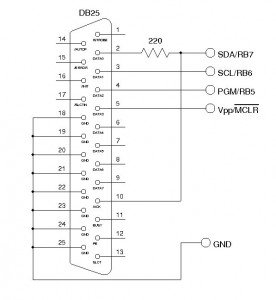
Since Linux is the main platform I am using at home, I was hoping to build my first PIC project using Linux as well. But none of my Linux boxes has parallel port and the only machine that has a parallel port is an old Windows box. So I had to use Windows for this project.
Unlike AVR, which heavily relies on the de facto open source compiler avr-gcc, open source support for PIC is a bit lacking. While SDCC is a popular choice for PIC MCUs in the open source world, its development lags somewhat and not all features are currently supported. Of course, if you are writing code in assembly, there’s the GNU GPUTILS.
I decided to play it safe and used the MPLAB C18 compiler that comes with Microchip’s MPLAB.
Since MPLAB does not support the simple parallel programmer I built, and the Broccoli18 software doesn’t support PIC18F4553, I went for a programmer utility called PICPgm. As it turned out, this utility is quite functional and easy to use. It is a pity that it is not open sourced.
The program I used to test my PIC 18F4553 simply flashes an LED on and off:
#include <p18f4553.h>

long int i=0;

void main()
{
  TRISDbits.TRISD0=0; // port D output

   while(1){
    PORTDbits.RD0=1; // on
    for(i = 0 ; i < 50000l ; i++);
    PORTDbits.RD0=0; // off
    for(i = 0 ; i < 50000l ; i++);
  }
}
Below are a few pictures of the programming board setup using the simple parallel programmer mentioned earlier. The programmer itself uses only one resistor. For this project, I used a 16 MHz crystal even though I probably could do without using it since 18F4553 has an internal oscillator and I could have just set the configuration bits to use the internal low frequency oscillator instead. The LED is connected to pin 19 (PD0).
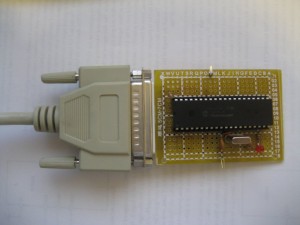
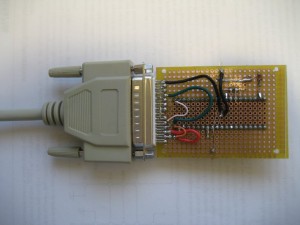
The default parallel programmer supported by PICPgm uses inverted signal pins. Since the simple parallel programmer uses none-inverted signals, I changed the default LVISP programmer signals to the following:
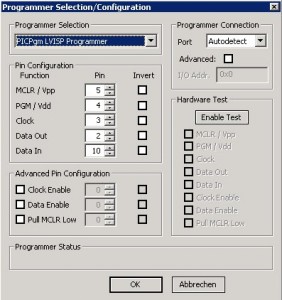
And after this change, PICPgm detected the MCU without any issues.
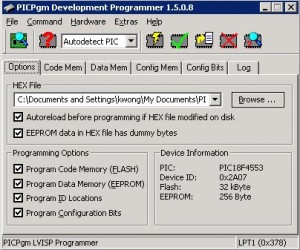
I also had to change ICPRT (dedicated ICSP port) and XINT (extended instruction set) to false, otherwise I would receive an error message during the verification process. According to PICPgm’s documentation, this issue is only cosmetic and shouldn’t affect programming the chip though.
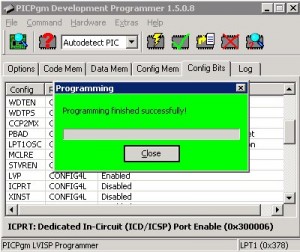
So it definitely requires quite a bit of knowledge to setup the proper hardware and the programming environment. This might be a challenge to most beginners. But again if you don’t want the hassle, you can always just buy Microchip’s PICKit3 and use it with the MPLAB environment. In terms of open source friendliness, PIC is still miles behind AVR in terms of the quality of the programming tools.
Next Steps
I am planning to build an open source PIC programmer like USBPICProg. With a working parallel programmer I should be able to boot-strap the code necessary for USBPICProg.
I might also try out the Pinguino environment as it claims to be similar to Arduino and it is an open source project as well.
Of course, after I build the USB programmer I should be able to use SDCC and run everything under Linux.

