There is a popular data logger shield out there designed for Arduino using a DS1307 real time clock chip. And that design makes data logging extremely easy if an Arduino board is used.
In this blog post, I will show you a data logger I built. What differs most from the popular data logger shield is that this one utilizes a standalone ATMega328p and the data to be logged is communicated to the chip via I2C. The data logger operates as an I2C master and the peripheral sensors operate as I2C slaves. Using this design, it is possible to make the logger more generic. I will discuss this in more detail next time.
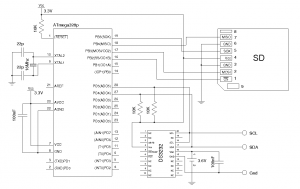
Since the ATmega328p chip can operate under 3.3V, the voltage level translator buffer (i.e. 74AHC125N) used in the data logger shield mentioned above can be omitted which simplifies the circuit quite a bit. One of my design goals is to be able to use this logger in long-running applications, so I chose to use a more accurate RTC DS3232 instead of the more popular DS1307. A side benefit for using DS3232 is that the RTC circuit is even simpler as the crystal for the RTC is built in.
Here is the schematic of the data logger:

Note that the circuit is powered using 3.3V instead of the regular 5V. While ATmega328p runs a little bit out of spec under 3.3V using a 16Mhz crystal, I have not run into any issues. But if you are building a mission-critical application, you would probably want to drop the crystal frequency a little bit.
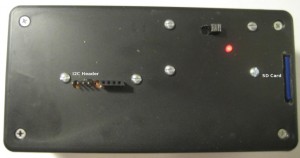
Here is a picture of the data logger. I used a National’s LP38692SD-3.3 as the 3.3V regulator (not shown in the schematics), and used 4 AA batteries to provide the power. The LED indicates the power status.

The Arduino Wire library can be used for the I2C communications with attached sensors. I used the code in Kenneth’s blog to read date/time from DS3232. In my next blog post, I will show you an example of how this data logger can be used.

