Intel’s Integrated Performance Primitives (IPP) is a low level C++ library. It provides routines that are highly optimized on Intel processors. I recently started using it because its vast speed advantage in signal and image processing applications.
Since the implementation of many of the functions are threaded, it makes the task of writing high performance applications much easier. Since it is a set of “performance primitives” as the name suggests, it uses its own data structures (e.g. Ipp8u) and does not provide functions to directly inter-operate with data coming from other sources (e.g. image files).
Fortunately, such data conversion is pretty straight forward. In this post, I will illustrate how to convert an image file (e.g. .jpg, .png, .gif) to the data IPP uses, and how to save the result into a standard image file once the processing is done.
Magick++ is a very comprehensive image-processing C++ library and the Image class it provides handles image files quite well. So I chose to use Magic++’s API to convert image files to the data structure IPP uses. In this particular example, I will use a gray level image. But in practice, color images can be easily handled in a similar fashion.
For the code mentioned below, the following headers and namespaces are used:
#include <Magick++/Image.h>
#include <Magick++.h>
#include <ipp.h>

using namespace std;
using namespace Magick;
And the following code shows how to convert a standard image file data into format that is suitable for IPP.
    IppStatus sts;
    Image img("{Image File Name}");
    Geometry g = img.size();

    unsigned int width = g.width();
    unsigned int height= g.height();

    Pixels view(img);
    PixelPacket *pixels = view.get(0,0,width,height);

    int stepByte = 0;
    //allocating a buffer of unsigned char (Ipp8u) for the image.
    Ipp8u *imgCache = ippiMalloc_8u_C1(width,height, &stepByte);

    for (unsigned int row = 0; row < height ; row++)
    {
        for (unsigned int column = 0; column < width ; column++)
        {
            PixelPacket *p = &pixels[column + row * width];
            Color c = Color(p->red, p->green, p->blue);
            double i = c.scaleQuantumToDouble(c.intensity()) * 255;
            imgCache[column + row * width] = (char) i;
        }
    }
The above code snippet first reads the image data into *PixelPacket and the pixel buffer is then converted into a one channel buffer of chars (color value 0-255). Note that the range of the image data Magick++ reads in is between 0 and QuantumRange, which needs to be converted back to the range 0-255 accepted by the Ipp8u buffer. If other types of IPP image buffers are used (e.g. Ipp32f), this scaleQuantumToDouble() conversion may not be necessary. At the end, the image data is converted into the one dimensional array imgCache which can be used by IPP procedures.
Once we are in the IPP data domain, we can proceed with whatever processing we had in mind. Here I will show the code for edge detection using Canny algorithm.
    IppiSize orgImgSize = {width, height};
    IppiSize newImgSize = {width + 2, height + 2};

    Ipp8u *imgCache1 = ippiMalloc_8u_C1(width + 2,height + 2, &stepByte);
    sts = ippiCopyReplicateBorder_8u_C1R(imgCache, width, orgImgSize,  imgCache1,
            width + 2 , newImgSize, 2, 2);
    IppiSize roi = {width, height};

    Ipp32f low=30.0f, high=100.0f;
    int size, size1, srcStep, dxStep, dyStep, dstStep;

    Ipp8u *src, *dst, *buffer;
    Ipp16s *dx, *dy;

    sts = ippiFilterSobelNegVertGetBufferSize_8u16s_C1R(
            roi, ippMskSize3x3, &size);
    sts = ippiFilterSobelHorizGetBufferSize_8u16s_C1R(
            roi, ippMskSize3x3, &size1);

    if (size<size1) size=size1;
    ippiCannyGetSize(roi, &size1);
    if (size<size1) size=size1;

    buffer = ippsMalloc_8u(size);
    dx = ippsMalloc_16s(size);
    dy = ippsMalloc_16s(size);
    dst = ippsMalloc_8u(size);

    sts = ippiFilterSobelNegVertBorder_8u16s_C1R (
            imgCache1, width + 2 , dx, (width + 2) * 2 ,
            roi, ippMskSize3x3, ippBorderRepl, 0, buffer);
    sts = ippiFilterSobelHorizBorder_8u16s_C1R(
            imgCache1, width + 2, dy, (width + 2) *2 ,
            roi, ippMskSize3x3, ippBorderRepl, 0, buffer);
    sts = ippiCanny_16s8u_C1R(dx,
            (width + 2) * 2, dy, (width + 2) * 2,
            dst, width, roi, low, high, buffer);
The code shown above is adopted from Intel’s IPP manual for image and video processing (by default it is located at /opt/intel/ipp/{version number}/em64t/doc/ippiman.pdf).
Please pay special attention to how the original image is extended via ippiCopyReplicateBorder_8u_C1R. The image is extended by 2 pixels in each direction because the 3×3 mask used for the filtering operation. I omitted error checking code for simplicity, but in general you need to check the return status of each ippi function call. When the call is successful, the status is ippStsNoErr. If you receive a value other than ippStsNoErr (e.g. ippStsStepErr) you will need to check your buffer size to make sure that they are adjusted according to the data type. For instance, in the code above dx and dy are both 16bit signed integers and thus they both occupy two bytes each.
To save the result image, we convert the pixel buffer back to PixelPacket type. Again we need to convert the data in the buffer (Ipp8u) to the range accepted by Magick++ API.
    for (unsigned int y = 0; y< height ; y++)
    {
        for (unsigned int x = 0; x < width; x++)
        {
            Color c;
            float clr = (float) dst[x + y * width] /255;
            float q = c.scaleDoubleToQuantum(clr);
            pixels[x+ y * width] = Color(q, q, q);
        }
    }

    view.sync();
    img.syncPixels();

    img.write("{Image File Name}");
We can also save the result data into a new image (instead of syncing the data back to the image object holding the original image data) using the code below:
    Image img1(Geometry(width, height),"white");

    for (unsigned int y = 0; y< height ; y++)
    {
        for (unsigned int x = 0; x < width; x++)
        {
            Color c;
            float clr = (float) dst[x + y * width] /255;
            float q = c.scaleDoubleToQuantum(clr);
            img1.pixelColor(x,y, Color(q, q, q));
        }
    }

    img1.write("{Image File Name}");
And finally the buffers used are freed.
    ippiFree(imgCache);
    ippsFree(buffer);
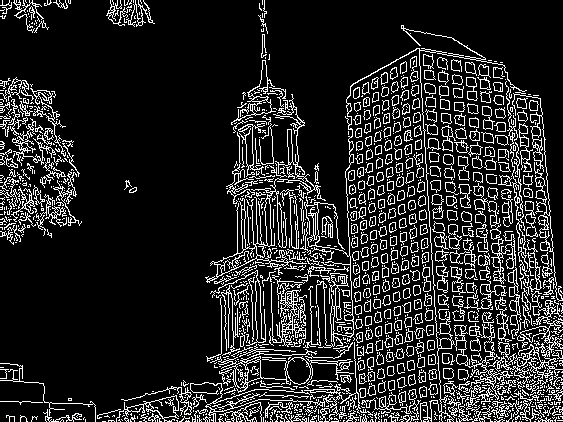
The following images show Canny edge detector in action using the code in this article:


